Templates | Properties tab
This tab provides this information on all of the properties for the selected template:
- Name - name of the property
- Base type - the data type (integer, string, boolean, decimal, file, message)
- Direction - the direction of the property (input, output)
- Scope - how the property is used (by the user, oem, etc.)
You can also use this tab to accomplish the following:
- On the Properties tab, click the template property you wish to review, which opens its Property page (example shown below):
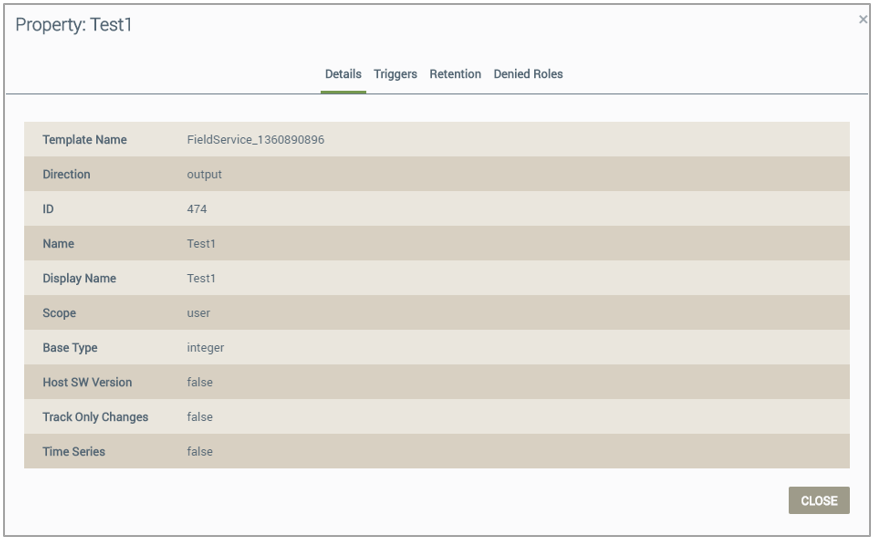
- Review the details provided:
|
NOTE |
If the property is a FeedProperty (details come from an outside service) these fields are displayed: Feed Type, Feed Subtype, and Data Feed Update Interval. |
- Template Name - the name of the template for the selected property
- Direction - the direction of the property (input, output)
- ID - the Ayla-assigned property ID
- Name - the name of the property
- Display Name - the user-friendly name for property
- Scope - how the property is used. (If OEM, the Ayla customer can see this property; if public, the Ayla customer and user can see this property.)
- If the selected property is a FeedProperty, the following data is provided:
- Feed Type - the type of feed (i.e., weather, air quality)
- Feed Subtype - the factor of selected FeedProperty (i.e. Air Quality – NO2, O3, CO, etc.)
- Data Feed Update Interval - the time when the update is requested (30 minutes, 1 hour, 2 hours)
- Base Type - the data type associated with the property (integer, string, boolean, decimal, file, message)
|
NOTE |
Notice that when you select "message," for the base type, the MIME Type field displays, as shown in the example below. The message data type can be a maximum of 512 KB. |

- MIMEMulti-purpose Internet Mail Extensions Type - standard data interchange format: application/jsonlightweight, text-based, language-independent data interchange format, application/octet-streambinary file, text/plainplain text file.
- Host SW version - if true, the Ayla Device Service (ADS) considers this as the Host MCU software version; if false, the ADS ignores the version device SW version applies to property
- Track Only Changes - boolean: if true, the log should track changes to this property, and if false, the log should not track changes
- Time Series - boolean: if true, queue datapoints to device if the device disconnects, and on reconnection, the datapoints are sent; if false, do not save datapoints if device disconnects
- Click CLOSE.
- On the Properties tab, click the template property you wish to review to open its Property page.
- Click the Triggers tab (example shown below):
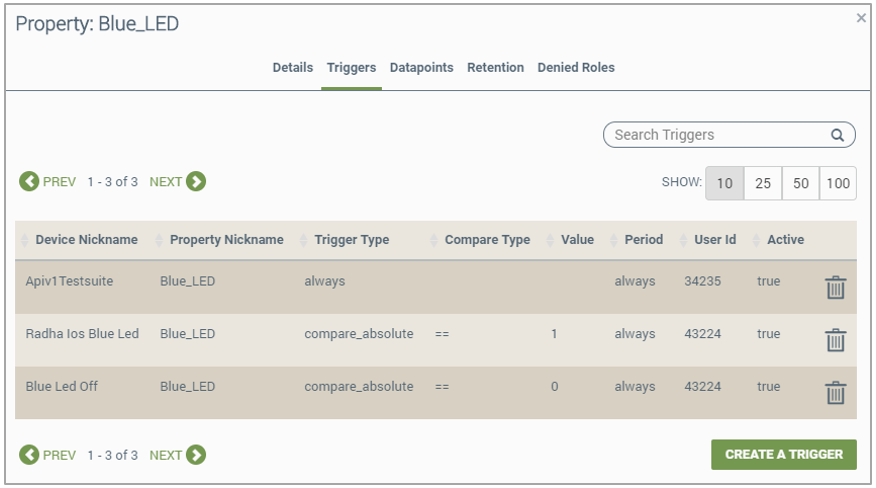
- Review the details provided:
- Device Nickname - a user-friendly name for the trigger
- Property Nickname- a user-friendly name for the property
- Trigger Type:
- always - the trigger is always active
- compare_absolute - the trigger rules are compared against a set value
- on_change - he trigger is always activated only upon a change
- Compare Type - the type of comparison for trigger type: ==, >, <, >=, <=
- Value - the value used to specify when the trigger should be active
- Period - indicates how often the trigger is active:
- always - the trigger is always active
- compare_absolute - the trigger rules are compared against a set value
- on_change - he trigger is always activated only upon a change
- User ID - Ayla-assigned user identification
- Active- boolean: if true, the trigger is active; if false, the trigger is not active.
- Click the Details tab, and then the CLOSE button to return to the Properties page.
- On the Properties tab, click the template property you wish to review.
- Click the Triggers tab.
- If there are multiple triggers for this template property, use the search tool (shown below) to find the trigger you wish to delete:

- Click the trash can icon for the trigger you wish to delete.
- Click the Details tab, and then the CLOSE button to return to the Properties page.
- On the Properties tab, click the template property you wish to review.
- Click the Triggers tab.
- If there are multiple triggers for this template property, use the search tool (shown below) to find the trigger you wish to delete:
- Click the trigger you wish to view to open the Trigger page (example shown below):

- On the Details tab (which displays by default), review the details:
- Template Name - the name of the template
- Property Name - the name of the property
- Property Nickname - a user-friendly name of the property
- Trigger Type - the type of trigger: always, compare_absolute, on_change
- Compare Type - the compare values: ==, >, <, >=, <=
- Value - the value that activates the trigger
- Period - the time allowed for the trigger to be active
- Click the CLOSE button if you are done; otherwise proceed to step 7 to review the trigger applications.
- Click the Trigger Apps tab (example shown below):
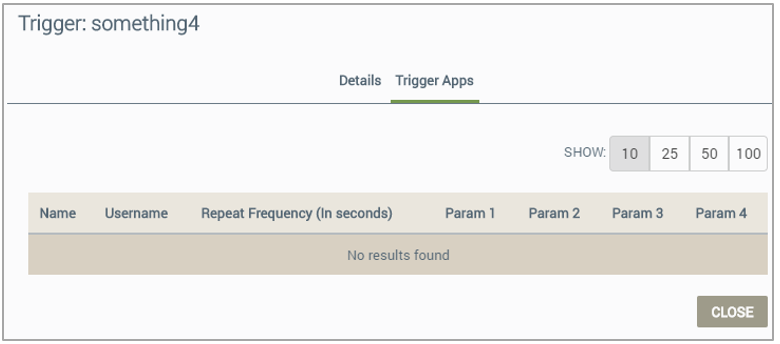
- Review the following information as needed:
- Name - the name of the type of trigger app: email, sms, forward, push_baidu, push_ios, push_android
- Username - the user name for application
- Repeat Frequency (in seconds) - the seconds between repeat of this trigger application
- Param 1 - first param of app, depending on the type of trigger app
- Param 2 - second param of app, depending on the type of trigger app
- Param 3 - third param of app, depending on the type of trigger app
- Param 4 - fourth param of app, depending on the type of trigger app
- Click the CLOSE button.
- On the Properties tab, click the template property you wish to review.
- Click the Retention tab (example shown below):
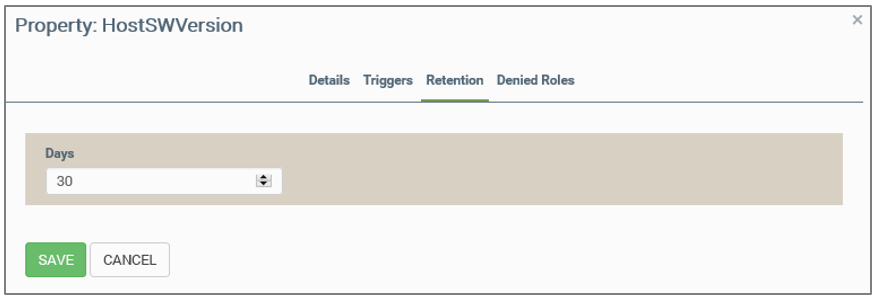
- Use the spinner to enter the number of days for retention.
- Click SAVE.
- On the Properties tab, click the template property you wish to modify.
- Click the Denied Roles tab (example shown below):
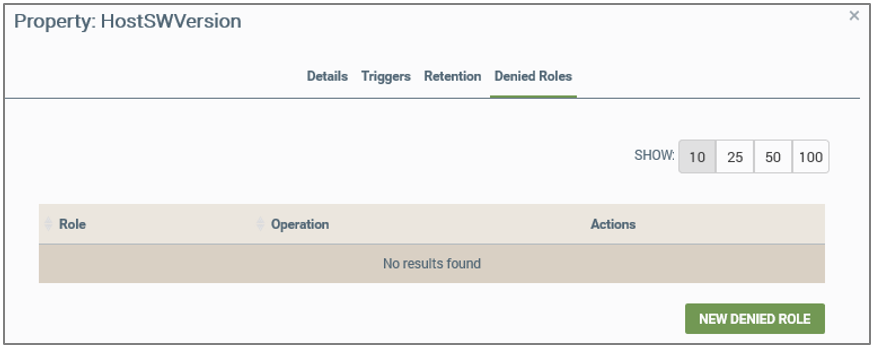
- Click the NEW DENIED ROLE button, which opens the New Denied Role dialog box, shown below:
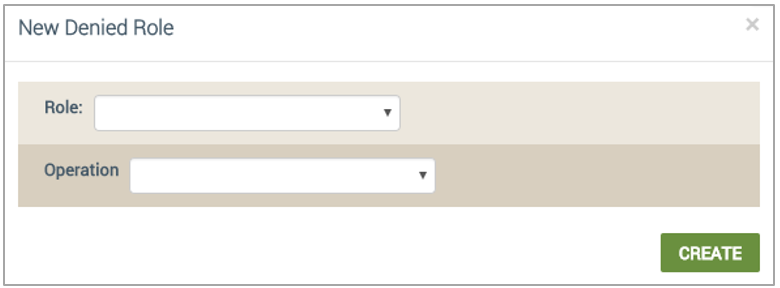
- In the Role drop-down, select the role that will be denied read or write access.
- In the Operation drop-down, select the access to be denied: read or write.
- Click the CREATE button.
- On the Properties tab, click the template property you wish to modify.
- Click the Denied Roles tab (example shown below):
- Click the denied role you wish to edit, which opens the Denied Role dialog box, shown below:
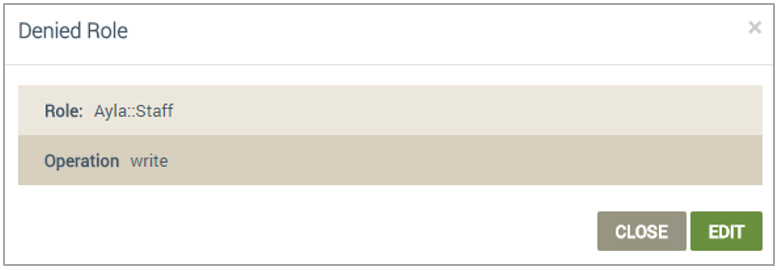
- Click the EDIT button.
- In the Role drop-down, select the role that will be denied read or write access.
- In the Operation drop-down, select the access to be denied: read or write.
- Click the UPDATE button.
- On the Properties tab, click the template property you wish to modify.
- Click the Denied Roles tab (example shown below):
- Click the trash can icon (
 ) for the denied role you wish to delete.
- Click the ACCEPT button in the Confirmation dialog box.
See also: Devices, .
How to get here on the dashboard: Click Templates in the Navigation Panel, and then click the Properties tab.
Please click here to let us know how we're doing. Thank you.